Posts

Showing posts from April, 2011

Birthday Card

Image
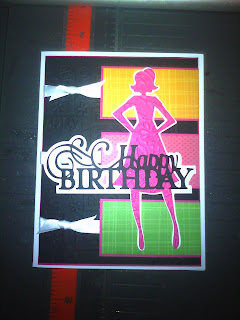
A friend asked me to make a birthday card for her. Her only requirements were to include pink, lime green, & orange and make it girly. I immediately thought of my Forever Young cartridge! But I wasn't quite sure of the design. I pulled out my January 2011 issue of CardMaker magazine and turned to page 74. There is a winter-themed happy birthday card that was perfect! I used foam tape to add dimension to the diecut & the end result was great. "Inspired By... Fridays" coming soon!

Cricut Cartridge Exploration: Nifty Fifties

Image
Over at Stampin' Dymonz Scrap Shack, there is a group for those of use who love our diecutting machines. In that group, there's a little thing called "Cartridge Exploration" where the members choose one of the Cricut cartridges & create a project to share with the other members. I decided to try my hand at it. I created the card from the Nifty Fifties cartridge handbook. It is a cute little card & I can see it being given as a mother's day card or just because type of card for anyone especially if they are into fashion or sewing. I'm not a fan of pink, so I decided to go with purple, black & white. The recipe called for: cardstock: white, pink {I used purple metallic}, black, pink dotted {purple patterned paper} ribbon: back patterned brads: 4 pink {I used purple} hole punch paper trimmer foam squares {I used 3M foam tape} adhesive The card measures 6" by 7". I was excited because aside from the card base, I was able to use a

Winner Time!

Image
Sooooo... I didn't make it to 350 followers today {I know there is still more time, but for me to get 85 followers in less than an hour is pushing it, even for me LOL} So, it is time to announce the winner from the 250 follower quest. Let me tell you - it was a bunch of work just to tally up the entries & make sure everyone got credit for how much they helped me (Thanks Again Everyone!) After much cutting & pasting & visiting blogs to verify info, I came up with 266 total entries! That is so amazing! I got a chance to read & reread some of your posts & again I was floored by the support & response to help a fellow crafter out that I almost cried. However, you all are reading this post for one reason & one reason only {smile} and that's to see if you or a friend will become the new owner of the Freshly Picked or Designer Calendar Cricut cartridge. With 266 entries, my darling daughter got tired of waiting for me to get everything ready so she

Blog Candy at DisneyDreamerDesigns!

One of my favorite bloggers has reached 1000 followers & is giving away some sweet blog candy! She is giving away the Cricut Nursery Rhymes cartridge to one lucky winner. She is giving you 10 CHANCES to enter - click here for details!

Love Is... Wall Art

Image
Happy Good Friday! A few weeks ago, my cousin asked me to create some wall art for her. She had purchased some vinyl & had finally figured out what she wanted it to say. She came up with a combination of scriptures about Love. I used my Cricut Design Studio, my Expression & my 12x24 mat to create the design. I used the Calligraphy Collection, MS Elegant Cake Art, MS Seasonal Cake Art, & Cindy Loo cartridges for the fonts. Weeding out all the little pieces inside the letters was horrendous! But my cousin enjoyed doing it, so it worked out well. Oh, and I didn't have transfer tape, so we used a wide roll of masking tape to transfer the vinyl to the wall... Whew, what a process that was. But she loves it & that's all that matters :)

Birdie Card - Cricut Cartridge Chaos Challenge #14 - Indie Art

Image
For the Cricut Cartridge Giveaway/350 Follower Quest - click here Over at More Than Favors , they have a weekly challenge featuring one of the Cricut cartridges - Cricut Cartridge Chaos Challenge. Usually, I just enjoy the beautiful creations I see, but this week, I promised you all a post everyday, so I figured I would join in! I had to have the Indie Arts cartridge when I saw it, but I didn't break down & get it until I saw it was available on CricutRewards.com. I still feel like I haven't used it enough, so I am happy that this is the cartridge this week (my week off). I decided to go with a card. I chose the bird image... and didn't know where to go from there... So, I thought about some of the things I have wanted to try & came up with this - Ingredients: Cricut Cartridges - Bird (Indie Art), Card Base (Ashlyn's Alphabet), Mat (Plantin Schoolbook) Cardstock - Card base (The Paper Company), Mat (DCWV LaCreme Mat Stack), Bird & Wing Accent (DCW

Versatile Blogger Award

Image
Thank you to BunnyFreak over at Everything Digital Scrapbooking and Diana at  Crazy for Cricut passed an award on to me! The requirements to accept this award are : 1. Thank the person who gave you the award. 2. Tell 7 things about yourself 3. Pass it on to 15 other bloggers & let them know Here are 7 things about me: I want to be a lawyer. I took a year off after undergrad & ended up falling into the nonprofit sector. That was almost 10 years ago. This year, I plan to take the LSAT and get back on track. I'm an organizer, even though you couldn't tell by glancing around my house... but if you look very closely, you can see the depth of organization in the areas where I have taken the time to get things in order. I love my church! I had been on a church strike for some years, but at the end of 2009 I found my "set place" and I am so thankful! I love bananas! I often find a way to work something metallic (usually cardstock) into my creations. T

Just a Few Cards

Image
I was so excited that I reached my goal that I decided to make a few really quick cards. I grabbed the Earth & Sky Linen Textured Cardstock textured value pack from The Paper Company (sold at Joann). I like this paper for the texture & ease of use - creases well, doesn't tear when embossed, & holds ink well - but wish it was thicker. I also pulled out DCWV Mariposa Chipboard Embellishments (caught them on clearance a year or so ago & hadn't used them) and Colorbok Life's Blessings Sticker Pack (another clearance buy). Add in some ribbon from my stash & a few sheets from my DCWV mat stacks and I was all set to go! On this card, I used my Sizzix Texture Boutique & my new Tim Holtz Alterations (embossing folders) in Damask ~ I just love this! My favorite in this impromptu set is this horizontal card featuring a sheet from the new DCWV Royal Garden mat stack . I just love the foil & bold colors of that stack! I'm still on a quest to

WE DID IT! 250 FOLLOWERS!

Image
What a wonderful surprise that I came home to today... WE DID IT! Thank you all so much! With all your help, I have reached my 250 follower goal! All of the posts leading up to this point are closed for comments (entries for the first Cricut cartridge drawing). I will be preparing my big bowl and adding all those who have earned entries to the pot. My daughter is on Spring Break this week & she will enjoy the opportunity to pick the winner. I am still holding out for 350 followers & I believe you all can help me do it! If I reach 350 followers by 11:59pm on Sunday, April 24, a second winner will be announced who will receive the other Cricut cartridge - remember the winner from the quest to 250 gets first choice!     All the ways to enter still apply & are posted below. If you have a post on your blog about the candy, please be sure to update the link to this post (no new comments are being accepted on any posts since the quest was first announced). I am off o

Only 8 Followers to Go!

Image
Thank you so much for everyone who has helped to spread the word about my giveaway & for all those who have started following my blog in that last few weeks! You read right ~ there are only 8 more followers to go until I will be choosing a winner of the Cricut Cartridge! Please go here to see all the details. Remember, there are multiple ways to enter & if I reach 350 followers within a week of 250, I will have another drawing.   Get entries by: ~posting a comment on my original post ~posting about my quest on your blog (coming back here to let me know) ~being a fan of M.M. DeZigns on Facebook (coming back here to let me know) ~following MMDeZigns on Twitter (coming back here to let me know) ~sending you friends here to let me know that you sent them ~commenting on all this week's posts

BFB Award

Image
I was so surprised tonight when I stopped by UniqueMonique 's blog and found that she had decided to give me the Best Friend Blogger Award. Here are the rules for accepting this award: 1. Post about award on your blog with a link back to the sender 2. Pass onto those who visit your blog and leave comments regularly. Here are the awesome crafters I am passing it on to: Melissa at DisneyDreamerDesigns Cathy at Cathy Plus 5 Jazmin at Jazzy Cards Renee at Domestik Diva Designs These bloggers are very talented & very supportive! Please stop by their blogs & show them some love (pick up a little inspiration while you are there!) Thanks again Monique!

My Core’dinations Creative Frenzy

Image
Core'Dinations is having a design team call & I decided to pull some of my projects together & give it a shot. I am quite partial to the Gemstones Collection. I love, love, love shiny things & I feel that this paper makes my projects pop! I have a small stash of other Core'Dinations papers too and love working with them. For a Super Bowl 2011 challenge, I reached for my Gemstones paper in Citrine & Yellow Topaz to give my bee & hearts a little more dimension & attraction.  For this quick condolences card, I reached for Gemstones cardstock in Sapphire for the mat for my sentiment. I used 3M foam tape to give it a little lift & the recipient was glad to receive the card. These invitations were a big hit! I used Gemstones cardstock in both Amethyst & Sapphire to create these beauties. I randomly ripped the base of each invitation & used a coordinating chalk ink to add color to the exposed edge... the ripped piece was not wasted either -

Thursday Test: Screen Printing Paints/Inks

Image
Happy Thursday Morning! If you've been following along, I took advantage of Michael's great sale on the YuDu last week and brought one home. I tried it out on a few projects & love the way they all turned out {let me take a moment to say that I already had YuDu experience from my job with ASM/Campaigners for ProvoCraft last summer, so I am a little ahead of the learning curve even though I have much more to learn}. I decided to try some things out - vinyl images versus the emulsion process, for example. I also did a little research on the inks that ProvoCraft makes and looked into using some other paints to see how things worked out. The YuDu brand inks are water-based and worked well for the most part when I used them last summer. I did have a problem with the paint running (leaving a shadowy effect on my screen-printed image) with the paint sometimes - not sure if this is human error or a characteristic of the paint because it seems with practice & attention to

Only 28 Followers to Go!

Image
Welcome, welcome, welcome to all my new followers! I am so happy to have you here, please feel free to look around & make yourself at home LOL! If you joined me from K Andrew's Link Up Party, be sure to stop by this post to learn about my super sweet blog candy & my quest to 250 followers (and what will happen if I get to 350 within a week of it) Be sure you do as much as you can so you can have as many entries as possible! I am so excited & glad to have you all here! Here are some bookmarks I made (great way to use your scraps) a while back ~ don't think I posted them ~ for the crew that helped me with training at work. Enjoy & stay tuned!

Love Link Up Party

I was going through the blogs I follow & came across an excellent "event". Dusti from Scrappin With Cricut was participating in K Andrew's Love Link Up Party & I thought I should join in too - I am on a mission after all, right? So the premise is simple: you post this linky thingy in your blog & help generate traffic & show some love to other bloggers! How cool is that? So... READY.....SET....LOVE/COMMENT....LINK....ADD the LINK to your BLOG!!! ***Guidelines*** 1. Follow EVERYONE's blog in the Linky Tool 2. Leave a comment 3. Add the link below to your blog post 4. Get ready for lots of new blog friends! (and over at Getting Cricky , there is a great prize for one lucky winner) And don't forget, there is still time to win the Cricut Cartridge(s) here and this party just might push me over the top! Stay tuned!

Fun with My YuDu!

Image
On Thursday, Michael's had the best price I have ever come across on the YuDu - reg. $299, it was on sale for $99. I made up my mind that I would sacrifice something this month & get it. I made a call to the nearest Michael's & found out they had two left. I took a "lunch break" and headed out to the store. The box was alot larger than I thought it would be. I had worked with the YuDu last summer, but never saw one boxed. Because it was so big, it stayed boxed in the livingroom until the weekend when I had time to figure out where to put my new toy... I mean investment ;) I found a link to a video where the creative crafter used vinyl on the underside of her screen instead of hassling with the emulsion. I figured that would be a great way to try a few things out without wasting my emulsion & permanently setting my screen (there's no emulsion remover in the box - what's up with that ProvoCraft?) I also found that the YuDu brand paint was a

How-To: Making Your Own T-shirts with Freezer Paper

Image
So, everyone has been asking about how to make t-shirts (design shirts) using freezer paper... here is the how-to! Gather your supplies: plain t-shirt Reynolds' Freezer Paper , cut to size (for example, 12" by 12" if working with the Cricut Expression) iron ironing board cardboard fabric paint Cricut & Gypsy / Design Studio (or some other way to create you desired design on your shirt) Step-by-step: Create you desired design. Using the Gypsy or Design Studio program, lay your desired design out on the "mat". When you have it sized just right, use the flip design feature (the design needs to be cut backward, especially if it contains words, to appear properly on the shirt). <-- I also center mine to give me a good border around the actual design. Place your freezer paper shiny side up (there is a shiny side & a matte side to the freezer paper). On the Cricut Expression, set the speed to 3 and the pressure to 3 (I never change my blade dep

Only 47 More To Go! (Winners Announced)

Welcome to all my new followers! I am glad to have you all aboard & plan to get around to your blogs too (if I haven't done so already). In my mini-quest within a quest, I gained about 30 new followers! Yay! And, I have to say that the majority of those followers came from our first winner of the Christmas Village cartridge... drum roll please... Melissa at Disney Dreamer Designs ! A special thank you to Melissa for sending over our surprise blog candy pack winner... with comment #12 (chosen by Random.org)... drum roll... TANDKPARKER! Please send me an email at mycraftz (at) aol (dot) com with your mailing addresses and I will get your goodies in the mail to you. ~~~ Stay tuned for the Freezer Paper shirt instructions & for my first project with my new toy - the YuDu ! ~~~ 

PUSH for 250 Followers!!! Pre-Prize Time!

Image
Thanks so much for all your support in helping me to get up to 250 followers! I feel like I have come so far but have a little ways to go... SOOOOOOOOO, I have a 48-hour challenge for a great prize - a Cricut cartridge !!! This is a challenge for my current followers . Send your friends over to become followers & comment on this post (making sure they say that you sent them) & you have a chance to win a Cricut cartridge*! It's that easy! The person who sends over the most referrals will win the cartridge! (Oh, and I'll use Random.org to find another winner amongst the new followers for a crafty prize pack! Want to make them feel welcomed too) Here's the cartridge*: This challenge will end at 11:59am EST on Thursday, April 7, 2011. {at this time, shipping is limited to the contiguous United States ~ I am aiming for 50 new followers from this challenge}

Let's Go Tigers 2!

Image
Homework is done & so is her shirt! She chose to go with the blue on white (I think she should have gone with the gray LOL). I love how crisp the lines are & think the Tigers should hire her to make shirts to sell at the games LOL! Wondering how to create your own custom shirts? Stay tuned ~ I'll be back later on this week with step by step instructions on how to make your own! Oh, don't forget to leave a comment! If you haven't stopped by in a while, use this link to find out about my quest for 250 followers & how you can win a Cricut cartridge! Have a great weekend!

Let's Go Tigers! (Still on a Mission for 250 Followers)

Image
Hello Everyone! Thank you all so much for your support in my quest (click this link to enter to win a cricut cartridge & learn all about the many ways to help me in my quest  here ) My daughter & I are making shirts again {check out her first shirt here }. Next Friday, she can wear a Detroit Tigers shirt to school, but she doesn't have one... That to me was an excellent excuse to pull out the freezer paper, the Gypsy, the Cricut Expression, and the iron! The Detroit Tigers have a few symbols including the Old English "D". The capital D from the Blackletter cartridge is just perfect! We have homework tonight, so we'll have to wait until tomorrow to see her finished product. {Remember: commenting on this post is another entry to win the cartridge!}