Using all the Cricut Cartridge Images - even the catridges you don't have!
 To do this wonderful trick, you start with your desired image in Design Studio. Here, I am working with an Elmo image from Sesame Street Friends. Here is the base for Elmo. I right-clicked on the mat to change the preview color to black.
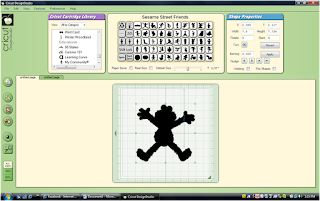
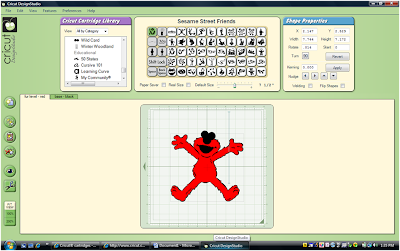


 For a clean preview – no gridlines, no controls tags, etc. – I add one last layer & select the "preview" option (eye to the left). This will be the image I use to create the clean Elmo image.

From here, you would copy your screen (use the Shift Key and the "Print Screen" key on your keyboard) and then paste into a Microsoft Word document. Using the "Crop" tool in Microsoft Word in the "Picture Tools". Here is the cropped image in its original size:  The image can be resized to whatever size you need for your card or layout. You can also use this method to integrate Cricut cartridge images (even those from cartridges you don't have!) into print projects – flyers, business cards, letters, etc. The possibilities are endless!
If you come up with any interesting projects using this technique, please be sure to post them & let me know! Enjoy!


Hey chica - I put a shout out to you and this wonderful discover on my blog - you are a genius gf!
ReplyDeleteI just found your blog from Tangee! Wow, what an awesome trick. I don't have DS just the gypsy. So can you cut this image right out on your cricut? So glad I found your blog. I am now following you and will be checking in often. TFS!
ReplyDeleteStephanie
http://www.alwayscrafting.com
That is one helluva great tip! Thanks for that!
ReplyDeleteGreat tip! I posted a link to your wonderful idea in the Cricut/SCAL/MTC Resources and Other Helpful Links section of my blog. I hope that's ok, if not, please let me know!
ReplyDelete@Tangee - Thanks so much!
ReplyDelete@Stephanie - I don't think you could cut this out on your cricut without a lot of trial and error. But, if you don't have this cartridge or any other cartridge, you can still get use out of the images. You can download the trial of CDS and go to town creating everything in the Cricut cartridge library! But you can print it out & cut it by hand in full color... add some text and make a birthday party sign or something else... and much more!
@WFD - thanks so much for stopping by & always be so supportive!
@Brandi - that is fine! Thanks so much!
WOW! This is good to know. Thank you!
ReplyDeletethis trick does seem very interesting, am not too familiar with DS, but am sure you can transfer the image to inkscape and convert it into an svg to use with scal. By the way I found you through Tangee's blog.
ReplyDeleteur pretty smart, never thought of that....of course Krazy T sent me over here LOL !!!
ReplyDeletewww.scrappinwithmybug.com
very clever. I saw different video using photo shop and another product, but this is much easier.
ReplyDeleteThis is such a great discovery! Thanks for sharing it with us :)
ReplyDeleteThis is amazing! Fantastic thought and what a great process. I am sharing your blog with everyone. TYFS!
ReplyDeleteYou're welcome Wendy!
ReplyDelete